
This is the 3rd post in a series featuring examples of how to use Power Query to transform the data in a typical downloaded account statement file into something that can easily be analyzed in an Excel workbook. In Part 1, we looked at one approach to transforming the data for one representative invoice record. In Part 2 we improved on the query by replacing the hard-coded arguments with dynamic references to allow the query to adapt to variability in the source data and we made extensive use of the Advanced editor, including adding spacing between logical groups of steps, documenting the steps with comments, and applying sensible step names throughout the query.
This article will demonstrate how we can reduce the number of Applied Steps visible in the query by nesting queries inside of the main query and describe some benefits for doing so.
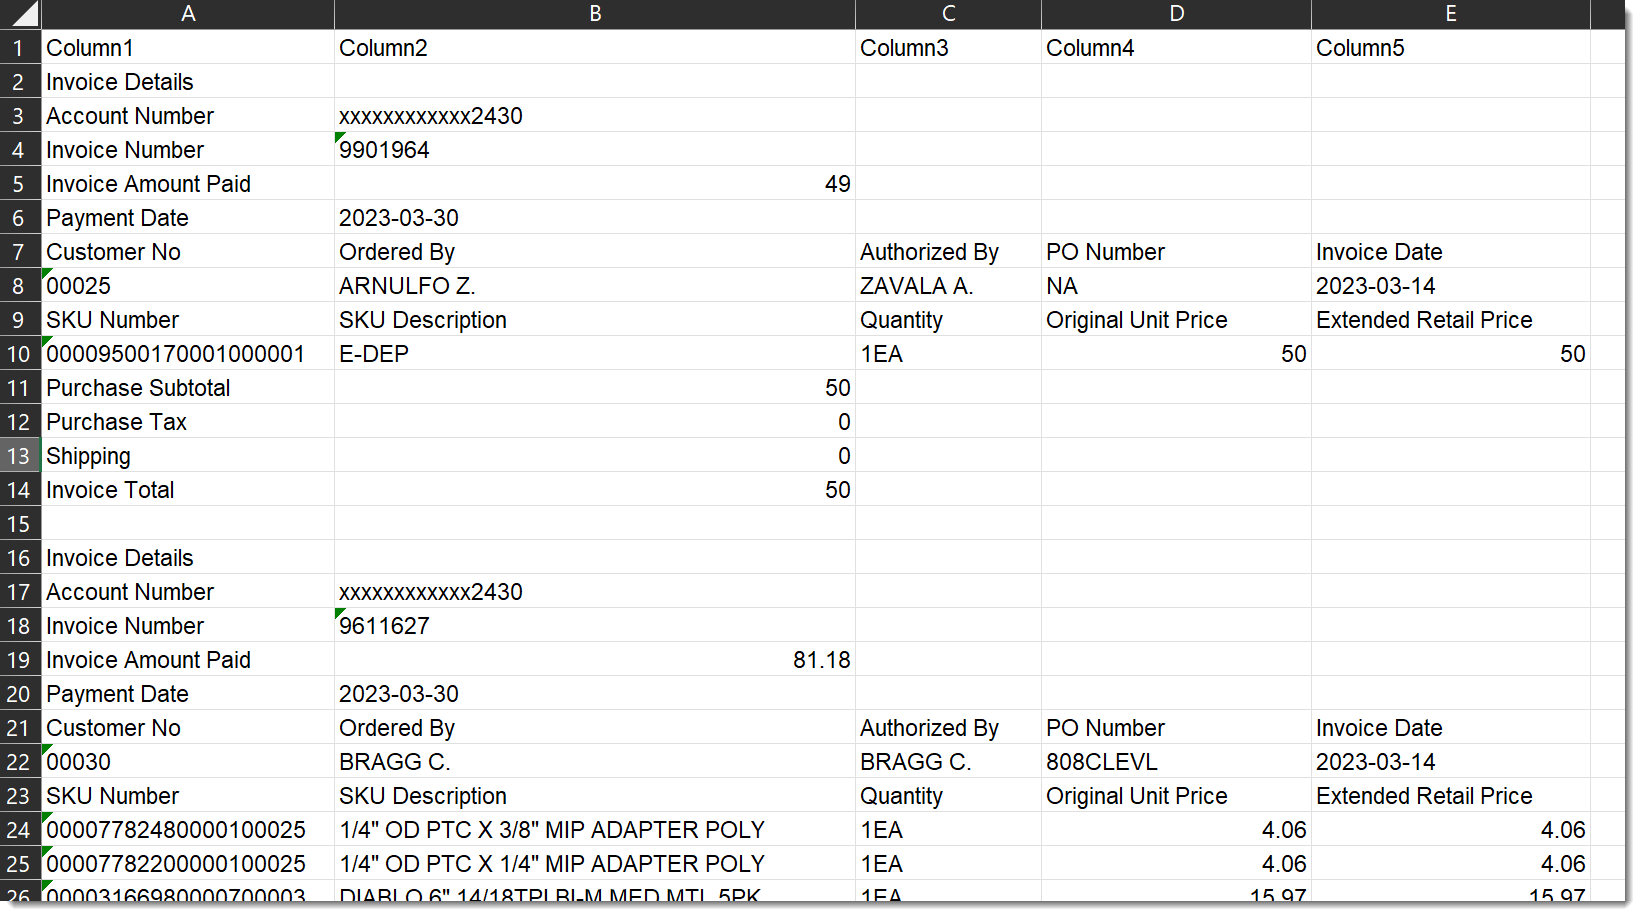
Download the starting file here.
Let’s dive in…
Why Nested Queries?
Nesting queries involves embedding one query within another. This approach enables a hierarchical structure where the output of an inner query serves as the input for an outer query. Each nested level can perform specific data transformations, filtering, or aggregations, allowing for a more granular and organized approach to data manipulation. The benefits of nesting queries includes –
- Modularity and Reusability: breaking down complex transformations into smaller, modular components to focus on a specific task or subset of data, making it easier to understand and modify individual components
- Improved Readability: each nested query handles a distinct part of the data transformation process making it easier to follow the logic, understand the purpose of each step and to document with comments.
- Enhanced Flexibility and Scalability: nested queries provide greater flexibility in handling complex data scenarios. As requirements evolve or new data sources are introduced, it’s easier to adapt and extend existing queries without starting from scratch.
- Performance Optimization: leveraging nested queries can lead to improved performance in certain scenarios. By breaking down large datasets into smaller, manageable chunks at each level, Power Query can optimize data retrieval and processing, resulting in faster execution times and reduced resource consumption
Refresher: What is a query?
In Power Query, a query is a series of data transformation steps. The query starts with the ‘let’ expression and ends with the ‘in’ expression. The ‘let‘ keyword introduces variable bindings, allowing you to define intermediate steps with assigned names which can be referenced later in the query. The ‘in‘ keyword signifies the end of the variable bindings and the beginning of the main query expression.
For example, the following query has a single transformation step named ‘Source’. The ‘in’ keyword denotes the end of the steps, and what follows the ‘in’ keyword is the output of the query.
let
	Source = Excel.CurrentWorkbook(){[Name="Table1"]}[Content]
in
	Source
Step 1: Duplicate an existing query
Our Example2 query has groups of steps which are suited to nesting. Let’s get to work to simplify the query code further.
Rather than modifying the Example2 query, let’s make a duplicate of it and call it Example3 (clever, I know…). In the Power Query window,
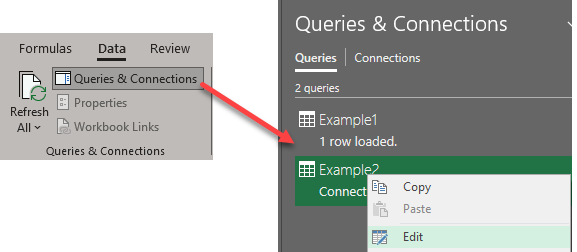
- Open Power query by clicking the Data tab and then choosing ‘Queries & Connections’
- right-click on either Example1 or Example2 in the ‘Queries & Connections’ pane and choose Edit
- right-click on the Example2 query and choose Duplicate
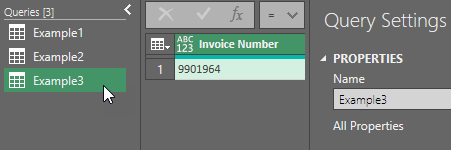
- in the Query Setting pane, edit the name property to Example3 and tab out of the field
- With Example3 selected, click on ‘Advanced Editor’ on the Home tab so we can begin our manual modifications
Step 2: Identify code blocks to nest
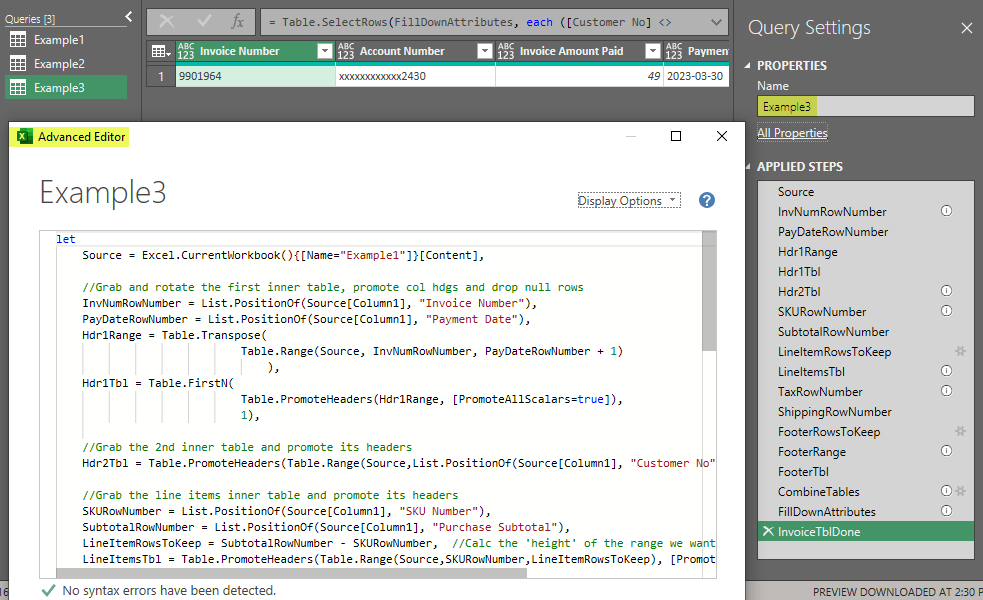
In the image below, I’ve highlighted the 4 distinct blocks of code to convert to nested queries. Each nested query will become a new step in the Example3 query and will therefore need a suitable name.
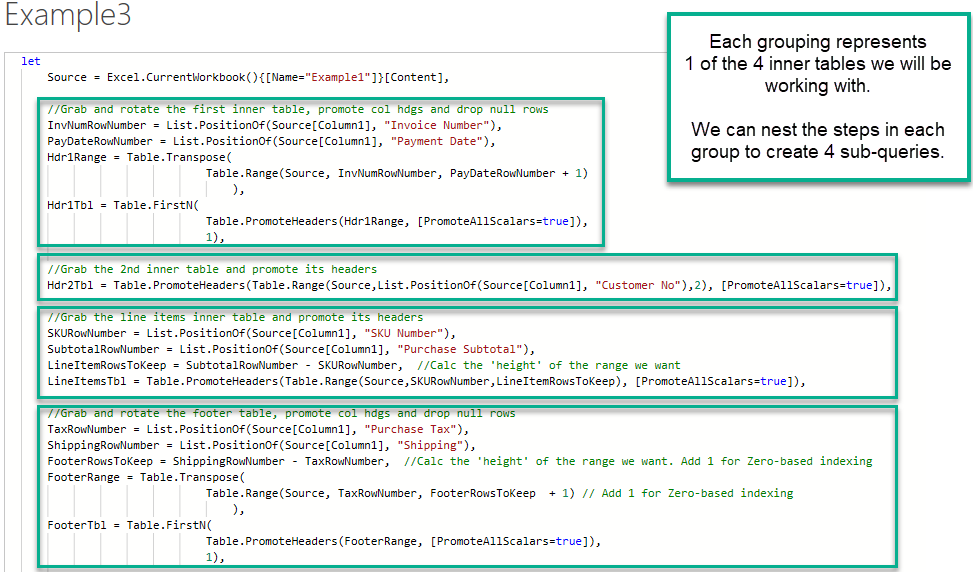
Step 3: Create a nested query for the Hdr1Tbl
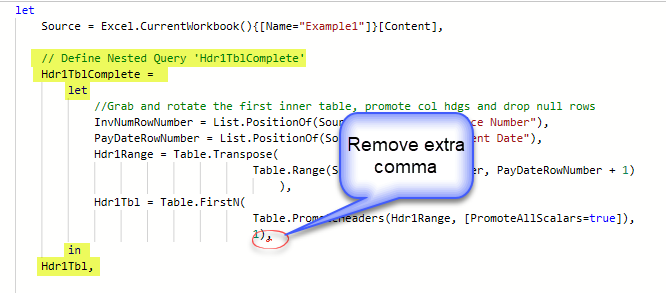
Let’s convert the first code block into a nested query named ‘Hdr1TblComplete‘ using the let and in expressions.
- Edit the query as shown in the image below
- make the highlighted changes first
- Remove the comma before the ‘in’ expression
- I like to indent the code as shown for improved readability.
- You can select blocks of code and use the Tab key to indent multiple lines at once
- Click Done to save your changes
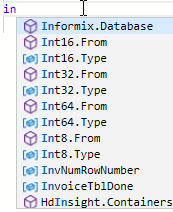
As you type the word ‘in‘, you may see a list of commands that begin with those letters. This is the IntelliSense or AutoComplete feature at work. If you hit the Tab or Enter key, it will insert whichever command is currently highlighted in the list.
To avoid entering some unintended command, type a space character after ‘in‘ before hitting Enter.
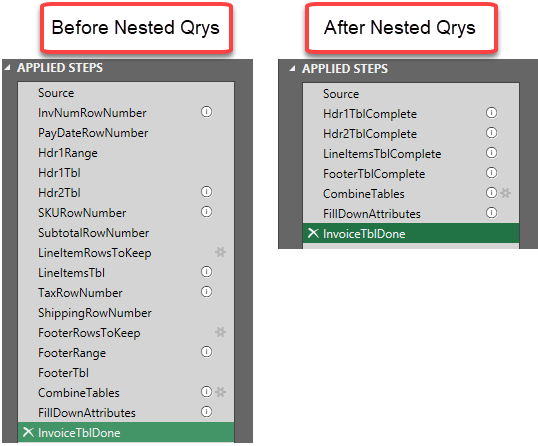
After editing the query, look at the Applied Steps pane. What used to take 4 steps now is encapsulated in just 1 step!

Step 4: Create a nested queries for remaining blocks
The second inner table, Hdr2Tbl, is a single step in our query. For practice, we will apply the same technique to it and the remaining 2 inner tables. I’m going to use the following names for the remaining steps:
- Hdr2TblComplete,
- LineItemsTblComplete, and
- FooterTblComplete.
Here’s the modified code after making the edits and cleaning up the indentation.
let
Source = Excel.CurrentWorkbook(){[Name="Example1"]}[Content],

// Define Nested Query 'Hdr1TblComplete'
Hdr1TblComplete =
    let
        //Grab and rotate the first inner table, promote col hdgs and drop null rows
        InvNumRowNumber = List.PositionOf(Source[Column1], "Invoice Number"),
        PayDateRowNumber = List.PositionOf(Source[Column1], "Payment Date"),
        Hdr1Range = Table.Transpose(
                                Table.Range(Source, InvNumRowNumber, PayDateRowNumber + 1)
                                    ),
        Hdr1Tbl = Table.FirstN(
                                Table.PromoteHeaders(Hdr1Range, [PromoteAllScalars=true]),
                                1)
    in
Hdr1Tbl,

// Define Nested Query 'Hdr2TblComplete'
Hdr2TblComplete =
    let
        //Grab the 2nd inner table and promote its headers
        Hdr2Tbl = Table.PromoteHeaders(Table.Range(Source,List.PositionOf(Source[Column1], "Customer No"),2), [PromoteAllScalars=true])
    in
Hdr2Tbl,


// Define Nested Query 'LineItemsTblComplete'
LineItemsTblComplete =
    let
        //Grab the line items inner table and promote its headers
        SKURowNumber = List.PositionOf(Source[Column1], "SKU Number"),
        SubtotalRowNumber = List.PositionOf(Source[Column1], "Purchase Subtotal"),
        LineItemRowsToKeep = SubtotalRowNumber - SKURowNumber,  //Calc the 'height' of the range we want
        LineItemsTbl = Table.PromoteHeaders(Table.Range(Source,SKURowNumber,LineItemRowsToKeep), [PromoteAllScalars=true])
    in
LineItemsTbl,


// Define Nested Query 'FooterTblComplete'
FooterTblComplete =
    let
        //Grab and rotate the footer table, promote col hdgs and drop null rows
        TaxRowNumber = List.PositionOf(Source[Column1], "Purchase Tax"),
        ShippingRowNumber = List.PositionOf(Source[Column1], "Shipping"),
        FooterRowsToKeep = ShippingRowNumber - TaxRowNumber,  //Calc the 'height' of the range we want. Add 1 for Zero-based indexing
        FooterRange = Table.Transpose(
                                Table.Range(Source, TaxRowNumber, FooterRowsToKeep  + 1) // Add 1 for Zero-based indexing
                                    ),
        FooterTbl = Table.FirstN(
                                Table.PromoteHeaders(FooterRange, [PromoteAllScalars=true]),
                                1)
    in
        FooterTbl,
Step 5: Combining the tables using the new names
The Table.Combine() function in the query is still using the old table references. Let’s modify the code to use the names of the nested queries instead. The CombineTables step will change from
= Table.Combine({Hdr1Tbl, Hdr2Tbl, FooterTbl, LineItemsTbl}),
to
= Table.Combine({Hdr1TblComplete, Hdr2TblComplete, FooterTblComplete, LineItemsTblComplete}),
Conclusion
Converting blocks of code into nested queries is fairly easy to do in the Advanced Editor. Nested queries offer Modularity and Reusability, Improved Readability, Enhanced Flexibility and Scalability and possible Performance Optimizations.
Comparing the Applied Steps before and after nesting queries you can see how we have simplified the overall query.
The completed example file can be downloaded from here.
In the next post, we will learn to convert our query into a custom function and then apply that function to the larger data set. Stay tuned for Part 4 soon.